Friday, May 30, 2008

Featured Cupcake Sampler!

Last weekend, when I was buried knee deep in wedding invites, I decided to take a break and stamp just for fun. Because any creative brain cells I own were lost in a see of red and black, I turned to Taylor's blog (her creations are magnificent!) to see what her Friday Cupcake Challenge was. It was an adorable layout, so I made this card.


Well... guess what!?! She picked me (well, my card) for this weeks Featured Cupcake Sampler! Can you even BELIEVE IT? I KNOW! (said in my best Monica from Friends voice).


This weeks sketch is awesome! And it's oh so versatile that I made two different cards with totally different feelings.


The Cupcake Card:


When LZ, Joy, Daisy and I were at CHA Anaheim in February, we walked into the Inkadinkadoo booth and saw this new line of stamps where the phrases were all written by kids! They were hilarious! Imagine my excitement when I walked into our local craft store the other day and they had just gotten them in! I had to get this one! IT'S SO TRUE! Don't you think? I mean really, isn't the best part of a cupcake the icing?


The tiny cupcake is stamped in different colors on the white panel to create the background. The colored cupcake is stamped on cardstock that was cut using the smallest circle Nestability. Instead of keeping the die on the circle and using my Copic Airbrush System to color the center like I usually do, I punched a separate circle, masked the cupcake and sprayed pink around the edge.


Since I wanted to keep the background light, so the phrase stood out, I just touched a tad bit of Stardust Stickles to each of the cupcake hearts.


My Mother's Garden:
I created a garden of flowers using Papertrey Ink's Green Thumb set, and then stamped the sentiment right over the top. I used Versa Magic chalk inks for the flowers giving them such a soft look. I would love to be a Color Namer when I grow up! lol You know, the person who comes up with the fabulous names given to colors! This flower garden is made using Turquoise Gem, Aquatic Splash, Mango Madness, Thatched Straw and Pixie Dust! Aren't they just awesome names?


The corner element is made using a Martha Stewart scalloped border punch. It reminds me of a doily! The little pink button needed a little something, so I polka dotted it with my Inkssentials opaque white pen.


I had such fun being the Featured Cupcake Sampler! The hardest part was keeping it a secret all week!!! (but, I'm a vault... right Joy!?!)


I hope you have time to play in the challenge this weekend! I can't wait to see what you create!


HB


Supplies:


Cupcake - Stamps: Katie & Co, Inkadinkadoo, Stampendous (Hey There Cupcake!) Paper: Fancy Pants (*Sweet Pea*), SU!, Papertrey Ink Ink: Palette Noir, SU!, Copic markers Misc: Nestabilities, Stickles, Copic Airbrush System, Gelly Roll Glaze pen, American Crafts ribbon, Cindyribbon, tracing wheel, sewing machine


Mother's garden - Stamps: Papertrey Ink, Rubber Soul Paper: SU! (Soft Sky DP, taken with teal), Papertrey Ink Ink: Versa Magic chalk inks, Palette Noir, Inkssentials opaque white pen, Gelly Roll stardust pen Misc: Martha Stewart scallop border punch, tracing wheel, Cindyribbon

Tuesday, May 27, 2008

The Wedding.

I've mentioned a couple times (at least lol!) that our daughter is getting married next month and I was making the invitations. Well, I am happy to say that they are all done... all in the mail and the RSVP's are trickling in.

Along with the invitations, I also made the table favors. You know, those cute little things that are at every place setting for people to say "what am I suppose to do with this?" or "she must have spent a fortune on these" or "she must have spent hours making these" (the last being the most appropriate response for these! lol).


The invites are 5 x 6 with a 1 inch pocket inside to hold the RSVP card, reception information, map, etc. I used white DCWV textured cardstock for the base and then added the layer of red and the pattern paper (Black Tie Optional by Imaginisce - I see Eclectic Paperie is out of stock right now... I must have bought all they had. ). The wording is computer generated.

The favors are little white boxes, wrapped with matching red cardstock and pattern paper. The monogram is computer generated and then punched out with the SU! scallop punch. Inside will hold two chocolates (cuz even though people will say "she must have spent hours making these" and then throw them away, they will surely enjoy the chocolate!


Now, I have to put in a very special THANK YOU! to Scor-Pal. That tool is now my new best friend! I am serious here. Do you have any idea how many score lines were needed to make these? Val had been telling me how wonderful this tool is since last year, but I was skeptical. Then, when I designed these invites and new how much scoring I had to do I gave in and ordered one from Eclectic Paperie. BEST thing I have ever done!


And lastly, I needed a card for the bridal shower this Saturday. My work table was already filled with scraps from the above mentioned project, so.... black and red it is!


Since her colors are black and red, and her flowers are red roses, I just can't go wrong with this one!


The flower bud is paper pieced in 3 layers - stamped first on the base cardstock and colored; stamped again on a scrap piece, colored and then cut out; and then stamped a third time, colored but this time I only cut out two of the leaves and layered them. It has beautiful dimension in real life.


The little tag has a light gray swirl stamped on it to match the base paper.
I just love this LOVE stamp by Papertrey Ink! I love fonts, especially when the sizes are mixed like this. (was that too many loves in one sentence? lol)


So... there you have it. This is what has been eating up all my time (and the blades on my paper cutter!) for the past few weeks.


HB


Supplies
:
Stamps: Inkadinkadoo, Memory Box, Papertrey Ink, Hot off the Press Ink: Palette Noir, SU! (real red, going grey), Copic markers Paper: DCWV, SU!, Papertrey Ink, Imaginisce Misc: CindyRibbon, Office Depot (tag), SU! punch

Sunday, May 25, 2008

Taylor's Cupcake Challenge

I love long weekends! Especially ones where we don't have to go anywhere!

I got all the wedding invitations done and a good start on the wedding favors, so as a reward I decided to take a break and stamp something. Since my brain is on wedding, and it would take FOREVER to find a creative brain cell I headed over to Taylor's blog to see what her Cupcake Challenge is for this week. I love when these creative genius' do the thinking for me! lol


I found this paper by Adornit.com at the LSS and it is so fun with all kinds of words and sayings all over it. The flower image is stamped and colored with Copic markers. I paper pieced the vase using Barely Banana cardstock that I stamped with polka dots in white craft ink.

It needed something around the outside (I am SO spoiled using the Nestabilities that I can't handle a plain edge any more!), so I used my Scor-Pal to make a perfectly straight embossed edge and then layered it on the rose cardstock. (Eclectic Paperie carries Scor-Pals. I would be LOST without it!)

The little flowers are punched out of rose cardstock and I added the polka dots with an Inkssentials opaque white pen (LOVE that thing!).


The center flower in the vase is also paper pierced. I used the same rose cardstock, covered it with Glossy Accents and sprinkled a tich of glitter on it before it dried. Yellow bling finished it just nicely.


The sentiment ribbon is a strip of rose cardstock that I scored twice at each end. I love 3-D embellishments, don't you?

This sketch is already in my sketch book! Thanks Taylor!!!

HB

Supplies

Stamps: Hero Arts, Savvy Stamps, Hot Off The Press Paper: Adornit.com, Papertrey Ink, CTMH, (the green is from my scrap bin, and I don't remember the manufacturer) Ink: Palette Noir, SU! (craft white), Copic markers, Inkssentials opaque pen Misc: Scor-Pal, small flower punch, circle punch, white EP, glitter, KaiserCraft (gem)

Saturday, May 24, 2008

Miss You!

Our daughter is getting married in June and I've been making her wedding invitations. Isn't it amazing that I've known about this wedding for months, I've had the supplies to make the invites for months, and yet here it is, one month out, and I'm racing to get them done and in the mail (which is why you haven't seen anything new here) ! YIKES! Thank goodness I only had 80 to make!

Anyway... I'm tired of looking at red, black and white (the color of her invites) so this morning I decided it was time to play with something fun! And what better place to look for inspiration than Beate's weekend challenge!


I found this Autumn Leave set called *Mindy's Zoo* at Archivers a couple months ago. It's filled with the most adorable animal images! And who doesn't love a palm tree with coconuts!

I stamped the palm tree on scrap cardstock, colored it with Copic markers and cut it out. I stamped another one on scrap cardstock, colored it, cut out just the top and mounted it on the first tree with small (teeny tiny) pieces of foam tape. I then filled in the coconuts with a glue pen, applied Fun Flock and got FUZZY COCONUTS! lol!


The monkey and grass are stamped on a circle cut out with a Nestability and colored with Copic markers. I masked off the top and using G21 Lime Green and the Copic Airbrush System, I airbrushed the ground. I then masked off the bottom and using B01 Mint Blue I airbrushed the sky.

Once all the coloring and airbrushing was done, I used my trusty Tim Holtz Craft Knife (I cannot live without that thing!) to cut around one edge of the grass. I was then able to slide the trunk of the palm tree in so it was placed behind the grass.

The image was then placed on a pink scallop circle that has the edges run through an SU! white craft ink pad using a circle of chipboard to elevate it just slightly.

I think I am going to put wedding stuff aside for today (I still need to do the table favors, the programs and who knows what else!) and play some more.

Hope you're having a wonderful Memorial Day weekend!

HB

Supplies:

Stamps: Autumn Leaves (Mindy's Zoo), Papertrey Ink (Mixed Messages) Ink: Palette Noir, Copic markers Paper: DCWV (Nana's Nursery/Baby Girl), SU! (Pretty in Pink), Papertrey Ink (white) Misc: Nestabilities, Copic Airbrush System, Stampendous (Fun Flock/Caramel Latte Tan), Office Depot (tag), SU! (eyelet), JoAnn's (ribbon), foam tape

Monday, May 19, 2008

May the Lord Bless You...

One of my very favorite tools are the Nestabilities. I love the finished look I get with the embossed edge. Plain cardstock with a matte just looks so blaaaah now. lol


I recently purchased the ovals and am so in love with them! They create such an elegant image on my cards. This simple *thinking of you* card was created totally by fluke. I was cutting some ovals for another project and realized that the scraps looked like a fame. So, using a larger die, I cut a piece of cardstock the size I needed for my card, used some Eclipse tape (awesome awesome stuff!) to hold the die in place and ran it through my Cuttlebug. I then cut a smaller oval, and leaving the die in place, used my Copic Airbrush System to spray E31 Brick Beige lightly around the outside. Keeping the die in place allows me to add a light spray of color to the outside of the oval, but not on the embossed edge!

The center oval is then popped up with foam tape. The Copic Airbrush System and the Eclipse tape are available at Eclectic Paperie and Ellen's store. I bought my Nestabilities from the fabulous Ms. Ellen!

So, the lesson learned here is... pay attention to your scraps! LOL

Hope you have a day filled with sunshine!
HB

Supplies:
Stamps: Papertrey Ink
Paper: Papertrey Ink
Ink: Papertrey Ink, Copic markers
Misc: Nestabilities, Copic Airbrush System, foam tape

Friday, May 16, 2008

Just Because

Does your life ever just get CRAZY busy? (If I knew how to insert smiley faces, I would insert the stressed one here! lol)


So, what is the best stress relief? Playing with ink and rubber, of course. How can you look at the little bird, sitting on his (her?) house and not just smile and relax?


After coloring the image with Copic markers (the absolute best marker to get shading like this!) I cut a freehand reverse mask and created the sky using B00 Frost Blue and my Copic airbrush system. I like the look of just part of the sky showing like this. To finish the image I used my tracing wheel and created a *frame*.

You should be able to click on the image to see a larger version.

You can find Copic markers at Eclectic Paperie and Ellen's Store! Links to the stores listed over to the right.

I hope your day is stress free!


HB


Supplies:
Stamps: Whipper Snapper Designs, Papertrey Ink
Paper: SU!, Papertrey Ink, Imaginisce,
Ink: Palette Noir, Copic markers
Misc: Buttons (Basic Gray Cupcake), tag (Office Depot), word window punch (SU!), tracing wheel


Wednesday, May 7, 2008

From the heart!

Coloring is such a soothing thing for me! When I'm stressed or just plain exhausted, I can pick up my markers and sit for hours coloring.


This image by Whipper Snapper is one of my favorites. It's the perfect size for shading and the the bigger flowers are what I call "non-specific", meaning I can make them any color I want to. For this card, I pulled some scraps out of my ever growing scrap bin (sheesh, I have GOT to do something about that), and colored the flowers to match the floral paper.


So, what do I have to be stressed about you ask? My friend Paula and I are having our annual Rubber Reduction sale this Friday/Saturday. So every night I am digging through drawers and pulling things off shelves and all around PURGING! LOL! It really does feel good to see some empty spaces on my shelf (and yes, it won't take me long to put something new in that place. lol)


Our sale is purely rubber stamps and scrapbook supplies. We've been doing this for the last 4 years or so and it's fun to watch the women waiting in their cars for the garage door to open.

Well... I better get busy! I haven't started to label things yet and it's already Wednesday! YIKES!!

Hope the sun shines on you today!
HB

Supplies:
Stamps: Whipper Snapper Designs, Hero Arts
Ink: Palette Noir, SU! (craft white) Copic Markers
Paper: SU!, Papertrey Ink, Fancy Pants and
Misc: Martha Stewart edge punch, Nestabilities, Copic Airbrush System, white detail EP


Sunday, May 4, 2008

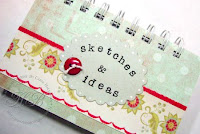
Sketches & Ideas

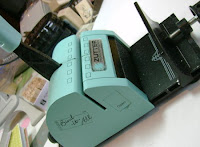
So ya'll know how much I love my tools, right? Let me introduce you to Bind-It-All!


I bought this amazing machine last year from Eclectic Paperie and at the time I thought "Cool! I can make my own journals and stuff!". But it's been so much easier to pick up already-made journals in the $1 bin at Michaels and alter them than to make my own, so the poor little machine just sat in it's box.


Until now!


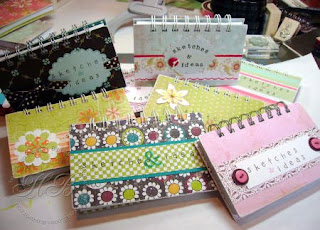
These are sketchbooks! They are the perfect size to carry in your purse so when you see that inspiration... that color combo in a store that would look awesome on a card... or you want to keep a sketch of one of the various sketch challenges you find on the web... or you doodle an amazingly cool layout when you are suppose to be listening on that conference call (oh wait, that's me. sorry)... you are ready!


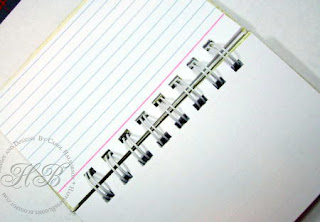
I used 3.5 x 5 recipe cards for the inside. One side of the card has lines, while the other does not, so you have a place to draw your sketch, and also lines to make notes.


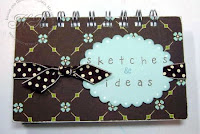
The front and back is a firm chipboard, covered in various papers and embellishments. So easy to make!


The Bind-It-All cuts through this stuff like butter! I put 9 recipe cards together each time I punched the holes!


Here is a close up of some of the designs:


I think these are going to be perfect for some stamper friends of mine!

The inspiration for these came from my extremely creative friend Mishie! She is the sketch Queen! She always carries a sketch book with her so when she sees cool color combos, or a layout idea pops into her head she can grab her book and write it down. For me, that is very important (the write it down part), because I think of cool things, and just as quickly forget them. LOL!


I think I'm gonna keep my Bind-It-All out on the counter for a while. I have quite a few ideas in my head for using it! oooo' I better write them down! (I know, I'm a dork!)


HB

Friday, May 2, 2008

LOVE my tools!

OK, so by now (if you've been taking the time to read what I write anyway. lol) you know that I LOVE my Copic Airbrush System and my little air compressor, right? So last night, I'm putting together some simple layout cards - trying to fill up the stash. I am not very good at pulling all the things together that match BEFORE I start to create. I'm more of a *create as I go* kinda girl. I have this card all put together, but it's missing something. It's simple, but not balanced. That big 'ol right side is toooo empty. I could put a ribbon there, but I always do that. I grab my button box, nothing matches. Does me no good to put a punch and sentiment there, because I put it on the image.


aaaaHA I say! Make my own button! With a Cuttlebug die! With FELT! (can you see my little brain just a turning?) Of course, the only felt colors I have are brown, deep red, light baby blue and white. Blue doesn't match, brown and red... no way. So, I use the 2nd smallest flower die and cut a white one, spray it with B00 Frost Blue and there you go! A matching button, that is soft and textured! (I love felt) The ink gives the felt a little stiffness, so I could punch a couple holes with my long reach punch and tread a piece of ribbon.

Oh how I love my tools! ÜHBSupplies:Stamps: Inkadinkadoo, Papertrey InkPaper: Imaginesce, SU! (barely banana, so saffron), Papertrey Ink (white)Ink: Palette Noir, Copic markers, Copic multiliner penMisc: Cuttlebug, Copic airbrush system, ribbon