Wednesday, December 31, 2008
Cuppie Calendar
Here is a sneak peak at the new perpetual calendar. I decorated *January* with this adorable snow cuppie from the new A Year of Sweets I set. She's all glittered and sparkled!
I paper pieced the cupcake paper, added some liquid applique to her earmuffs, gave her some pink frosting with Copic markers, and lots of sparkle with Starfire glitter! (the papers and glitter are part of the Key Ingredients). I cut a couple of "balloons" using the smallest oval Nestability and added strings with a .05 Copic multiliner pen to add some festivness by our daughter's birthday. A strip of matching paper on the botton and the word *celebrate* finished everything off nicely.
I can't wait to show you how I've decorated the rest of the calendar! The new sets and calendars are available January 2nd at the Taylored Expressions store
Be sure and check out all the girls on the Baker's Dozen Design Team! They are gonna knock your socks off with their creations! You can find links to everyone's blog over on the side ====>
HB
Supplies
Stamps: A Year of Sweets I, A Year of Sweet Sentiments (Taylored Expressions), Liquid Applique, pearl (Hero Arts),
Paper, cardstock, glitter (Taylored Expressions Key Ingredient kit)
Ink: Tuxedo Black (Memento), Versamark, Copic markers,
Misc: large eyelet (Making Memories), snowflake punch (Martha Stewart), Copic Airbrush System
Sunday, December 28, 2008
Mushroom Forest
I did a bit of masking for this card to create the "forest" and the family of bugs and then colored them with Copic markers. I added some sparkle to the hearts with a red Spica glitter pen.
The papers, from the Just Dreamy 2 collection (My Minds Eye) are just so gorgeous and they really make card making easy.
Thursday, December 25, 2008
Merry Christmas!
It was a beautiful, low key Christmas at our house! I love when the true meaning of this season outshines massive amounts of stress and spending.
I have a couple of Christmasy items to show you before the holiday is officially over. The first is an altered BEANO card. My friend Lisa Zappa had some of these cards (she tells me they were called BEANO cards back in the day before they were BINGO cards 'cuz people used beans to mark their numbers!) and she's been giving them to her friends asking if they would decorate it for her BEANO Christmas tree.
Now, if you know Lisa, you know she is the Queen of Shabby so I knew I needed to do something special. I found this delicious paper (Wassail by Basic Grey) and made a little chipboard house. The trees are cut from the Tree Lot paper. It has little triangles of different patterns all over it. I found the adorable cat charm at JoAnn Fabrics and since her cats are good friends of mine :o) I knew it would be perfect. I added a bling swirl for chimney smoke and a lace border and then held my breath in the hopes she would like it. She did! whew!
My other project comes in the form of holiday tags. The other managers and I at the bank I work at decided to host a Christmas pizza lunch for the staff instead of buying little gifts for everyone. I volunteered to make a little *something* for each place setting. Everyone uses sticky notes, but the bank does not supply them, so they are always in demand, and I thought they would be the perfect little gift. I made these round tags using the JustRite Christmas Ensemble for the borders (snowflakes on blue and holly on white).
I cut the tags out using the large scallop circle die (Nestabilities) and then added the centers. The snowflake tag uses a snowflake from Pine's Snowfall Additions set (Papertrey) stamped in light blue with a glittered snowflake (Martha Stewart punch) over the top. The holly tag uses a Christmas tree from a little set I found at Michael's.
I used the JustRite Brayton Font for the words on the back. I LOVE how I can create just what I want to say, without having to use the computer!
I tied the tags to a stack of sticky notes with white and red curling ribbon. They looked like little packages sitting on the tables and the staff LOVED them! As I walked the floor later that day I saw a lot of them had hung the tags on the walls of their cubes!
Well... the family is wanting to play cards so I better run! I hope your holiday was filled with peace and your new year is filled with abundant blessings!
HB
Tuesday, December 16, 2008
Holly Cuppies
I recently got the Christmas Ensemble from JustRite Stamps and man, I am IN LOVE with these stamps! I used the holly circle for this card as the perfect frame for the holly cuppie from Taylored Expressions Season's Sweetings set.
I stamped the holly circle with black ink, colored the leaves with Copic markers and then glitzed up the berries with a Stardust glittering gel pen in ruby. The cuppies are stamped and their wrappers are paper pieced. I colored the cuppie holly leaves and glitzed the berries the same way.
Everything is edged with a liquid gold paint pen and attached using foam tape.
I wish you could see the sparkle and shine!
Thursday, December 4, 2008
From our house...
I had my Taylored Expressions stamps out and as I looked through the sets I pondered how the Halloween stamps are so stinkin CUTE, but they are so under-used. Halloween just doesn't last long enough. Anyway... I decided to use the haunted house in the Frightful Night set as a cute little house in a winter scene.
I stamped the house on cream cardstock, colored it with Copic markers and cut it out. I created the snow with Liquid Pearls and sprinkled fine glitter over it. It's attached with foam tape to a cream rectangle that I airbrushed with pink (hey... sky can be pink you know!)
The adorable paper (October Afternoon) has pink polka dots on the reverse side and I put a pink crystal (Zva Creative) on each dot. You just GOTTA love pink bling!
The sentiment is from the Home Sweet Home Set and is stamped on cream with Pink Petunia (Versa Magic chalk ink). I cut out one of the little snowflakes on the paper and added a pearl.
Wednesday, December 3, 2008
Christmas ATCs
I stamped the image on Neenah white cardstock and colored it with Copic markers. I couldn't find just the right sentiment that fit the small size of an ATC, so I reached for my JustRite Brayton Font set (50pt) and stamped {25} in Fired Brick Distress ink. (oh I hope they get that it means Dec 25th. Do ya think?) After I punched the date with a 1 inch circle punch, I ran a glue pen around the edge and dipped it into Fire Engine Red glitter.
So, now I have all the pieces and realize that the image is just to bright white for the Christmas paper. What to do? Easy... Tim Holtz to the rescue!
It's one of my very favorite, and most used tools! It does more than just leave a darker *edge* to your image. If you lay the image flat on a piece of paper or mat, and rub the sponge applicator in a circular motion towards the center of the image, you get a lovely shading that goes from darker on the outside edge, to softer/lighter in the center.
Well, that's all for tonight. Thanks for coming by!
Monday, December 1, 2008
Beate's sketches
Last week I sat there looking at this adorable new Hero Arts mini set, the one that I've been searching everywhere for, and nothing sparked. Nothing. Nada. Zip. I knew if I could just come up with a layout, everything would start to flow (ok. I didn't really *know*, but I was sure hoping hard!)
I finally turned to the amazing Beate and her fabulous layout challenges. And it worked!
This one is her Friday sketch # WSC64. I LOVE this layout and I know I'll come back to it often. I stamped the cute little critter angel on PTI Kraft in black, filled in the wings with white craft ink using a mini sponge applicator and then covered them with glitter.
I used a round Nestability to cut out the circle and edged it with white craft in. The polka dot strip is PTI Kraft embossed with the CB Swiss Dots folder and I then ran the white craft ink pad lightly over the top.
The next started out as a Christmas ATC for a swap, but it just didn't look right. Again, I reached out to Beate's fabulous blog for an idea as to how to use a 2.5 x 3.5 image on a card.
Saturday, November 22, 2008
Relaaaaaax
So what do I do when life is crazy? I color. When I color I don't have to think. I don't have to push my already full brain to come up with a unique layout. I can just sit with my container of Copic markers and a few cute images and pretty soon I am in Happy Land.
The new Our Craft Lounge stamps are PERFECT for coloring (they were designed by Marianne Walker, the Copic Queen after all). I just love how the image is really the focus of these cards, not the paper or the layers or the 'bellies.
The first... Birthday Elle, is from the Lil' Pea-Nut set. I love how the lines in the stamp define where I need to put my shading! I used 3 different greys and added pink to her ears and adorable toes. The balloons are paper pieced, covered in Glossy Accents (Ranger), and attached with foam tape. The ground and sky are shaded using the Copic Airbrush System.
The second... Happy Day is from the Pat the Dog set. While I could have made it easy on myself and colored the heart, I decided to paper piece the heart so it matched the scallop frame. - cutting paper is a relaxation too! :o)
Both cards are made with My Minds Eye paper. Totally takes the work out of creating a card when I have papers that match! Don't you agree?
Friday, November 14, 2008
Gracie turns 6
The party cuppies (from the Sweet Celebration set) are stamped on white cardstock, colored with Copic markers, and then cut out. I added some Crystal Stickles to the tops of the hats before attaching them to the card with foam tape.
I colored the *6* with a Copic marker, frosted it with glitter and placed it in the Happy Birthday circle that was stamped with the JustRite C-45 small letters.
Now for the bag... I found this little green gift bag on clearance at Target! It came with a funky colored cherry hanging in the "window". I removed that uuuugly cherry and replaced it with a
cute cuppie all frosted with sparkles.
IT'S HERE!
Here is the full set:
Thursday, November 13, 2008
It's a dogs world!
Today I'm featuring Pat the Dog! With the cold and snow we got yesterday, I just wanna be this cuddly little puppy laying in the sun!
Here is a look at the whole set. I giggled when I saw the *censored* sign. :o)
This weekend only (Friday, Saturday, and Sunday, November 14th, 15th, and 16th, ) with each stamp set you purchase, you will get a ticket included with your order! Save those tickets! The following weekend, OCL will start drawing winners. You just never know when a new ticket number will show up on their site. YOU COULD WIN!!! (and we ALL love to win!)
Check out these amazing blogs for peaks at more of the OCL sets being release on Friday!
Lisa Zappa
Lila Holgate
Bev Barton
Heather McNally
Pam Hooten
Cami Turnbow
Kisa Peters
Joanne B
Lisa Mathis
Joy Kennedy
Be sure and check back tomorrow! Not only is it Friday (shout HURRAY!), but I'll have another sample to show you plus the link to the Our Craft Lounge store! wooHOOO!!!
Wednesday, November 12, 2008
* New *
LOOK HERE! There's a new stamp company in town!
Yup, you heard me right. Our Craft Lounge is introducing a line of THE most adorable stamps!
Here's a sneak peak from the For the Love of Birds set.
Check out these blogs for more samples! ooooo' you are gonna love what they've created!
Kendra Wietstock
Bev Barton
Heather McNally
Pam Hooten
Cambria Turnbow
Kisa Peters
Supplies
Stamps: For the Love of Birds (Our Craft Lounge)
Paper: KaiserCraft, Neenah
Ink: Burnt Umber (Palette), Antique Linen (Ranger Distress Ink), Copic Markers
Misc: Nestabilities, ribbon (May Arts), embroidery floss (DMC)
Wednesday, November 5, 2008
Right at Home!
These cards look similar, but one I kept simple, just stamping and coloring.
Wednesday, October 29, 2008
Holiday Tags
When I received the new Stamp a Sweet Impression sets by Taylored Expressions, I knew these where going to be the perfect stamps to use for gift giving. I used the wonderful papers and ribbons that come in the Christmas Key Ingredient kit, along with white Tag Treat tags, to make tags to tie onto homemade treats.
I covered a metal tin that I found at Michaels and then created the Holiday Tags label using an oval Nestability and JustRite Stamps Curlz font. Once I stamped the words in red Memento ink, I used my trusty Copic Airbrush System to add some green shading.
Thursday, October 23, 2008
It's a Cookie Exchange Party!
This year, I'm going to have a Cookie Exchange Party and I made up some special invitations to send to friends using stamps from Taylored Expressions new release (TODAY)!
The Tag Treats set is filled with all those sayings you want in a stamp (like the one on my invitation), but can never find!
I made a pocket card using papers from the Christmas Key Ingredient kit. Before taping the sides shut, I cut a circle out of the center using a scallop circle Nestability.
I put a piece of transparancy sheet in the inside of the pocket to make a window. The adorable Holly Cuppie (from the Season's Sweeting set) is attached to the front of the transparancy. *You're invited to a Christmas Cookie exchange* is stamped on white cardstock, cut out with an oval Nestability and then edged in Fire Red glitter (which also comes in the Key Ingredient kit!).
The inside of the pocket is a recipe card (you can see the stripes of the card through the window!) and I've asked each person to write the name of their cookie on the card.
When they get to the party, they will put their recipe card in this adorable Gingerbread House holder. The gingerbread house, from the Home Sweet Home set, is stamped on white cardstock, colored with Copic markers, highlighted with glitter and bling, cut out and attached to a simple wood photo holder (it was actually a Halloween ghost that I broke the ghost off of). I used papers from the Christmas Key Ingredient kit to cover the base and then glitterfied the edges.
Let it snow * Let it snow * Let it snow
LOL! You thought I meant winter didn't you! Nope! It's time for a new release from Taylored Expressions! I am SO excited about this release, not just because they are so adorable, but because I LOVE to make holiday cards and the ideas are endless with the stamps in these sets.
I created this card using the Home Sweet Home set along with the Key Ingredient kit that Taylor has available in her store. What could possibly be easier than having everything you need to make adorable holiday cards all in one kit!?!
I stamped and embossed the Let it Snow sentiment 3 times with white embossing powder. I did the same with the snowflakes and then added a drop of Crystal Stickles in the center of each one.
The snowman cuppie is sitting on a pile of *glitter snow*. His scarf and the band of his hat are paper pieced and the rest is colored with Copic markers.
The cool ribbon is also from the Key Ingredient kit. Don't you just love the swirls in it?
My pics have a little bit of blue tint to them. That's what happens when you live in two places and do the best you can with what you have. LOL! Maybe we can all just think it looks frosty cold! :o)
Be sure to check out what the rest of the Baker's Dozen Design Team has created! OMGOSH they are all FABULOUS!!! You'll find the links to their blogs over on the side =>
Supplies
Stamps: Home Sweet Home (Taylored Expressions)
Paper, cardstock, ribbon (Key Ingredients by Taylored Expressions)
Ink: Memento, Copic markers
Wednesday, October 15, 2008
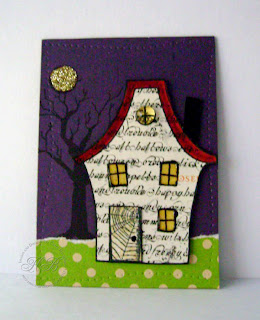
Halloween ATC
For this Halloween swap I reached right for my Frightful Night set by Taylored Expressions. The tree in that set will be a forever staple in my Halloween card making, and the house is just so adorable.
I stamped the house on a sheet of Halloween paper by Making Memories that is filled with spooky words and cool script. After trimming it out, I colored the roof with a rust marker (Marvy) and the chimney with a Warm Gray (W10) Copic marker, going over it again with a black glaze pen to give it a shiney look.
The windows are cut out with a craft knive. I stamped the center of the house on a scrap of white cardstock and colored the windows with Y21(Buttercup Yellow) Copic. I attached this piece to the back side of the house with tape and then filled in the windows with Glassy Accents.
The round window is colored with the same Y21 marker, with a little clear glass bauble over the top.
The door is way cool in real life. I used a Stampology frame stamp that has a spider web on it. I stamped it on a scrap of white cardstock, went over it with Antique Linen Distress ink (direct to paper), then stamped the door part of the house over the top. I cut out the door, attached it to the house and highlighted the door nob with a dot of the black glaze pen.
Sunday, October 12, 2008
More thanks
Here is a quick and easy one using one of my favorite Whipper Snapper Designs stamps.
I stamped the birdhouses on white cardstock, colored them with Copic markers and then added blue sky with the Copic Airbrush System.
Some cute pattern paper, a little ribbon, a button and you're done!
Speaking of Thanks!... thank YOU for coming to visit!
HB
Supplies
Stamps: Whipper Snapper Designs, Papertrey Ink
Paper: Neenah, BoBunny, SU!
Ink: Noir, Burnt Umber (Palette), Copic Markers
Misc: Copic Airbrush System, ribbon (JoAnns), button (Foo fa la), scallop border punch (Martha Stewart)
Saturday, October 11, 2008
A cup full of thanks!
So, I sat down last week with the set, a 12x12 piece of gorgeous paper and a drawer full of scraps. (ok, I had to reach out to my Nestabilities, some PTI sentaments and a few 'bellies too. lol) The result was these three cards. Don't you just LOVE when things come together easily?
Here are the individual cards:
I think a set of these will be perfect in a gift basket with a new coffee cup and some flavored coffee! hmmm... now the wheels are turning! lol
Misc: Nestabilities, swirl embossing folder (Cuttlebug), ribbon (BoBunny), buttons (Foofala), oval punch, word window punch (SU!), glitter (Martha Stewart), brad and brad flower (?), tracing wheel