Monday, May 19, 2008

May the Lord Bless You...

One of my very favorite tools are the Nestabilities. I love the finished look I get with the embossed edge. Plain cardstock with a matte just looks so blaaaah now. lol


I recently purchased the ovals and am so in love with them! They create such an elegant image on my cards. This simple *thinking of you* card was created totally by fluke. I was cutting some ovals for another project and realized that the scraps looked like a fame. So, using a larger die, I cut a piece of cardstock the size I needed for my card, used some Eclipse tape (awesome awesome stuff!) to hold the die in place and ran it through my Cuttlebug. I then cut a smaller oval, and leaving the die in place, used my Copic Airbrush System to spray E31 Brick Beige lightly around the outside. Keeping the die in place allows me to add a light spray of color to the outside of the oval, but not on the embossed edge!

The center oval is then popped up with foam tape. The Copic Airbrush System and the Eclipse tape are available at Eclectic Paperie and Ellen's store. I bought my Nestabilities from the fabulous Ms. Ellen!

So, the lesson learned here is... pay attention to your scraps! LOL

Hope you have a day filled with sunshine!
HB

Supplies:
Stamps: Papertrey Ink
Paper: Papertrey Ink
Ink: Papertrey Ink, Copic markers
Misc: Nestabilities, Copic Airbrush System, foam tape

Friday, May 16, 2008

Just Because

Does your life ever just get CRAZY busy? (If I knew how to insert smiley faces, I would insert the stressed one here! lol)


So, what is the best stress relief? Playing with ink and rubber, of course. How can you look at the little bird, sitting on his (her?) house and not just smile and relax?


After coloring the image with Copic markers (the absolute best marker to get shading like this!) I cut a freehand reverse mask and created the sky using B00 Frost Blue and my Copic airbrush system. I like the look of just part of the sky showing like this. To finish the image I used my tracing wheel and created a *frame*.

You should be able to click on the image to see a larger version.

You can find Copic markers at Eclectic Paperie and Ellen's Store! Links to the stores listed over to the right.

I hope your day is stress free!


HB


Supplies:
Stamps: Whipper Snapper Designs, Papertrey Ink
Paper: SU!, Papertrey Ink, Imaginisce,
Ink: Palette Noir, Copic markers
Misc: Buttons (Basic Gray Cupcake), tag (Office Depot), word window punch (SU!), tracing wheel


Wednesday, May 7, 2008

From the heart!

Coloring is such a soothing thing for me! When I'm stressed or just plain exhausted, I can pick up my markers and sit for hours coloring.


This image by Whipper Snapper is one of my favorites. It's the perfect size for shading and the the bigger flowers are what I call "non-specific", meaning I can make them any color I want to. For this card, I pulled some scraps out of my ever growing scrap bin (sheesh, I have GOT to do something about that), and colored the flowers to match the floral paper.


So, what do I have to be stressed about you ask? My friend Paula and I are having our annual Rubber Reduction sale this Friday/Saturday. So every night I am digging through drawers and pulling things off shelves and all around PURGING! LOL! It really does feel good to see some empty spaces on my shelf (and yes, it won't take me long to put something new in that place. lol)


Our sale is purely rubber stamps and scrapbook supplies. We've been doing this for the last 4 years or so and it's fun to watch the women waiting in their cars for the garage door to open.

Well... I better get busy! I haven't started to label things yet and it's already Wednesday! YIKES!!

Hope the sun shines on you today!
HB

Supplies:
Stamps: Whipper Snapper Designs, Hero Arts
Ink: Palette Noir, SU! (craft white) Copic Markers
Paper: SU!, Papertrey Ink, Fancy Pants and
Misc: Martha Stewart edge punch, Nestabilities, Copic Airbrush System, white detail EP


Sunday, May 4, 2008

Sketches & Ideas

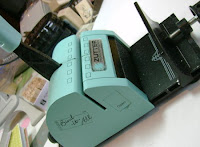
So ya'll know how much I love my tools, right? Let me introduce you to Bind-It-All!


I bought this amazing machine last year from Eclectic Paperie and at the time I thought "Cool! I can make my own journals and stuff!". But it's been so much easier to pick up already-made journals in the $1 bin at Michaels and alter them than to make my own, so the poor little machine just sat in it's box.


Until now!


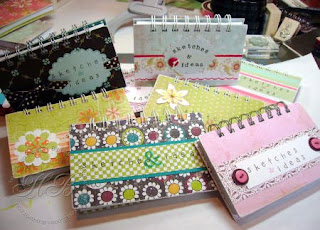
These are sketchbooks! They are the perfect size to carry in your purse so when you see that inspiration... that color combo in a store that would look awesome on a card... or you want to keep a sketch of one of the various sketch challenges you find on the web... or you doodle an amazingly cool layout when you are suppose to be listening on that conference call (oh wait, that's me. sorry)... you are ready!


I used 3.5 x 5 recipe cards for the inside. One side of the card has lines, while the other does not, so you have a place to draw your sketch, and also lines to make notes.


The front and back is a firm chipboard, covered in various papers and embellishments. So easy to make!


The Bind-It-All cuts through this stuff like butter! I put 9 recipe cards together each time I punched the holes!


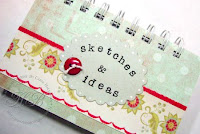
Here is a close up of some of the designs:


I think these are going to be perfect for some stamper friends of mine!

The inspiration for these came from my extremely creative friend Mishie! She is the sketch Queen! She always carries a sketch book with her so when she sees cool color combos, or a layout idea pops into her head she can grab her book and write it down. For me, that is very important (the write it down part), because I think of cool things, and just as quickly forget them. LOL!


I think I'm gonna keep my Bind-It-All out on the counter for a while. I have quite a few ideas in my head for using it! oooo' I better write them down! (I know, I'm a dork!)


HB

Friday, May 2, 2008

LOVE my tools!

OK, so by now (if you've been taking the time to read what I write anyway. lol) you know that I LOVE my Copic Airbrush System and my little air compressor, right? So last night, I'm putting together some simple layout cards - trying to fill up the stash. I am not very good at pulling all the things together that match BEFORE I start to create. I'm more of a *create as I go* kinda girl. I have this card all put together, but it's missing something. It's simple, but not balanced. That big 'ol right side is toooo empty. I could put a ribbon there, but I always do that. I grab my button box, nothing matches. Does me no good to put a punch and sentiment there, because I put it on the image.


aaaaHA I say! Make my own button! With a Cuttlebug die! With FELT! (can you see my little brain just a turning?) Of course, the only felt colors I have are brown, deep red, light baby blue and white. Blue doesn't match, brown and red... no way. So, I use the 2nd smallest flower die and cut a white one, spray it with B00 Frost Blue and there you go! A matching button, that is soft and textured! (I love felt) The ink gives the felt a little stiffness, so I could punch a couple holes with my long reach punch and tread a piece of ribbon.

Oh how I love my tools! ÜHBSupplies:Stamps: Inkadinkadoo, Papertrey InkPaper: Imaginesce, SU! (barely banana, so saffron), Papertrey Ink (white)Ink: Palette Noir, Copic markers, Copic multiliner penMisc: Cuttlebug, Copic airbrush system, ribbon

Wednesday, April 30, 2008

Great stamps + simple design =

My Papertrey anniversary set came in the mail yesterday! (yes, that shake of your screen is me bouncin'!) Now, I admit... I searched the Papertrey forums looking for a hint of what the set would look like a couple weeks ago and when Nichole posted a pic I looked at it for quite a while. "What am I gonna do with that?" was my first response. The words are wonderful, but there's no main image? Just a bunch of little doodads (adorable doodads to be sure!).


But (and isn't there always a *but* to a story like this? lol), then I spent the weekend stamping my friends Lisa and Pine. Pine (ok, so ya'll know her as Heather Nichols, but I've always called her Pine and I get confused when people call her Heather), was playing with her anniversary set and making the most unbelievably awesome backgrounds! She completely turned my impression of this set around!


So in honor of Pine (who is the craft and white QUEEN), I made this card. I love it when stamps are so gorgeous that you don't need any designer paper or a bunch of bellies to make the card look good!


The main image (ya, ok... so I still need a main image) is by Inkadinkadoo and is embossed with white detail embossing powder. The design on the bottom of the cards is one of the designs from the anniversary set, also embossed in white detail embossing powder. The Papertrey stamps are clear acrylics, so I can see where I'm putting them without digging out the stamp positioner!


Here's a close-up of the tag. The little background is a matching stamp in the set.


I only had light blue ribbon and I wanted it to match the little flower, so I used my Copic Airbrush system and sprayed it with E31 Brick Beige until I had that vintage look. Oh, how I love my tools!


Thanks Pine, for making me see things differently!


HB


Supplies:
Stamps: Papertrey Ink, Inkadinkadoo
Paper: SU! (craft), Neenah (solar crest)
Ink: SU! (craft white, brocade blue)
Misc: tag from office supply store, Cindyribbon, Prima flowers, SU! brad

Sunday, April 27, 2008

A busy day!


What a busy day! (Well, busy in the *rubber room* anyway) I found these adorable little lunch boxes at Michaels the other night and thought they would make perfect gift tins.


I made 6 note cards, a coaster book and a gift card holder for each tin. I'm thinking they would be perfect for an end of the year teacher gift or even for Mother's Day!


I love these little gift card holders! Pine was working on them when we stamped at Lisa's last weekend and they go together just easy peasy! The base is a little envie that opens on one end (mine are from SU!)


Ok, so here comes a confession.....


I bought my Bind-It-All from Eclectic Paperie when they first came out about a year ago. Today was the first time I've used it. (hangs head in shame) I don't know what I was so afraid of. OMWord it is so easy to use! And it cuts through coasters like BUTTER!


Val send me a coaster book for my birthday last year and I love it so much I can't bring myself to use it! lol Now, I'm glad I haven't because it was the inspiration for these.


So... after a full afternoon of *work*, here is what I ended up with:


I used so many different products on these, that I'm not going to do a supply list (I'd like to go to bed before midnight!) But the main stamps were from Papertrey Inc, SU! and Hero Arts.


Thanks for stopping by!

HB


ps - Want to know what DH was doing while I was working so hard? He was vacuuming cobwebs in the basement! YUCK! LOL (I think I won the better deal here, don't you?)